Modify Your Greenhouse for Year-Round Mushrooms
By Camila Duarte • 12th Apr
A mushroom cultivation greenhouse and a year-round greenhouse designed for vegetables aren't the same beast, and that's where most growers trip up. I spent Saturday morning last fall converting half of my structure for oyster mushrooms while my niece timed me with her phone timer. We'd watched the YouTube builds, studied the specs, and felt ready. Three hours in, staring at a blocking fabric that didn't fit the frame the way the manual suggested, I messaged the vendor directly. They replied within two hours with a workaround. That responsiveness mattered as much as the hardware itself because when you're building something outside the typical greenhouse playbook, real time, not brochure time, is what counts. If you're planning structural tweaks, start with our greenhouse customization guide.
Mushroom growing in a controlled environment demands a fundamentally different approach than tomatoes or lettuce. Here's what actually changes, and what stays the same.
The Core Differences: Light, Humidity, and Air
Mushrooms don't photosynthesize. That's the first thing to internalize. While a traditional controlled environment mushroom growing system for vegetables craves light hours and solar gain, mushrooms thrive in darkness or very low light. This inverts your design priorities. For a step-by-step overview of darkness and humidity targets, see our dark mushroom greenhouse guide.
In a vegetable greenhouse, you vent aggressively to prevent humidity above 70-75% and manage heat. In a mycology greenhouse setup, you're actively maintaining 80-95% humidity in specific zones while still avoiding stagnant, pathogenic air. The paradox: you need circulation for oxygen and CO₂ exchange, but direct airflow dries mycelium and pins. This isn't splitting hairs. Improper air handling is the fastest path to contamination.
Temperature needs overlap more closely. Both benefit from cool, stable conditions. But mushroom substrates are far less forgiving of wild swings. Oysters prefer 55-65°F; shiitake prefer 50-60°F. Lettuce can bounce around and recover. A 10-degree swing can abort a flush.
Structural Comparisons: What to Change
Glazing and Light Management
Vegetable growers obsess over glazing clarity and diffusion. Mushroom growers need the opposite: dark environment greenhouse conditions with just enough transparency to inspect logs and view progress without light stress.
Most growers use heavy shade cloth, opaque plastic, or paint polycarbonate panels white or black. I chose 50% shade cloth over half the greenhouse roof and left the north side with reflective film. This isn't elegant, but it works. A cleaner (and pricier) option is retrofit frosted polycarbonate or double-wall panels painted from the inside. The cost premium over shade cloth is roughly $3-5 per square foot, but it's permanent and doesn't degrade seasonally.
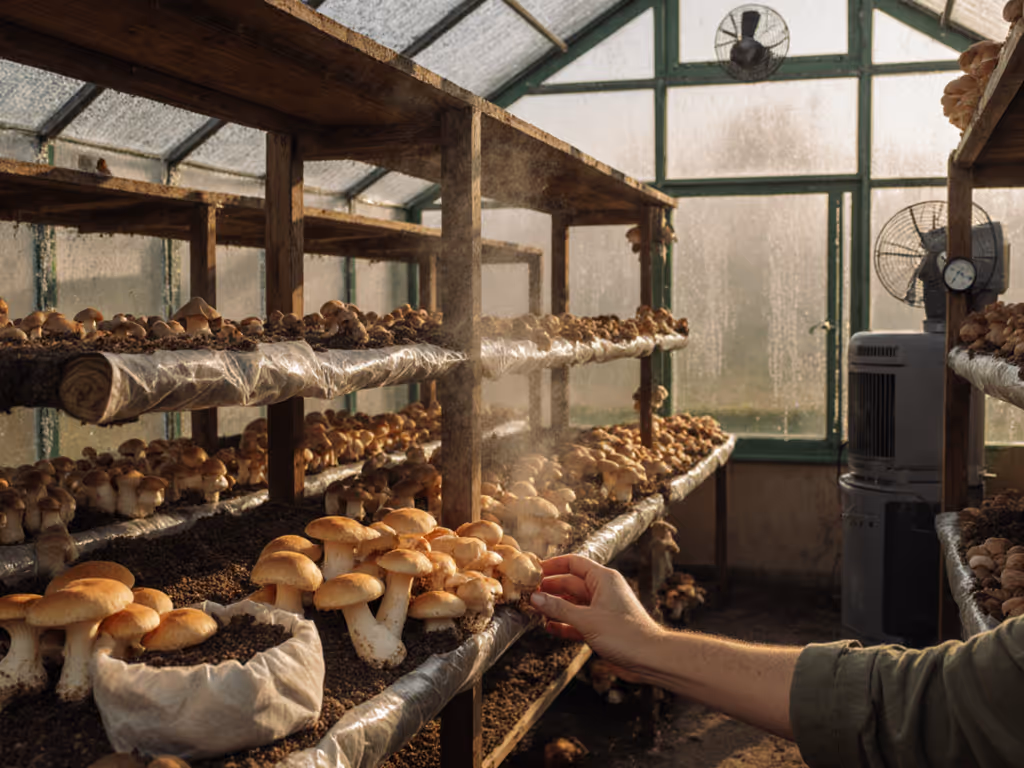
Shelving and Vertical Space
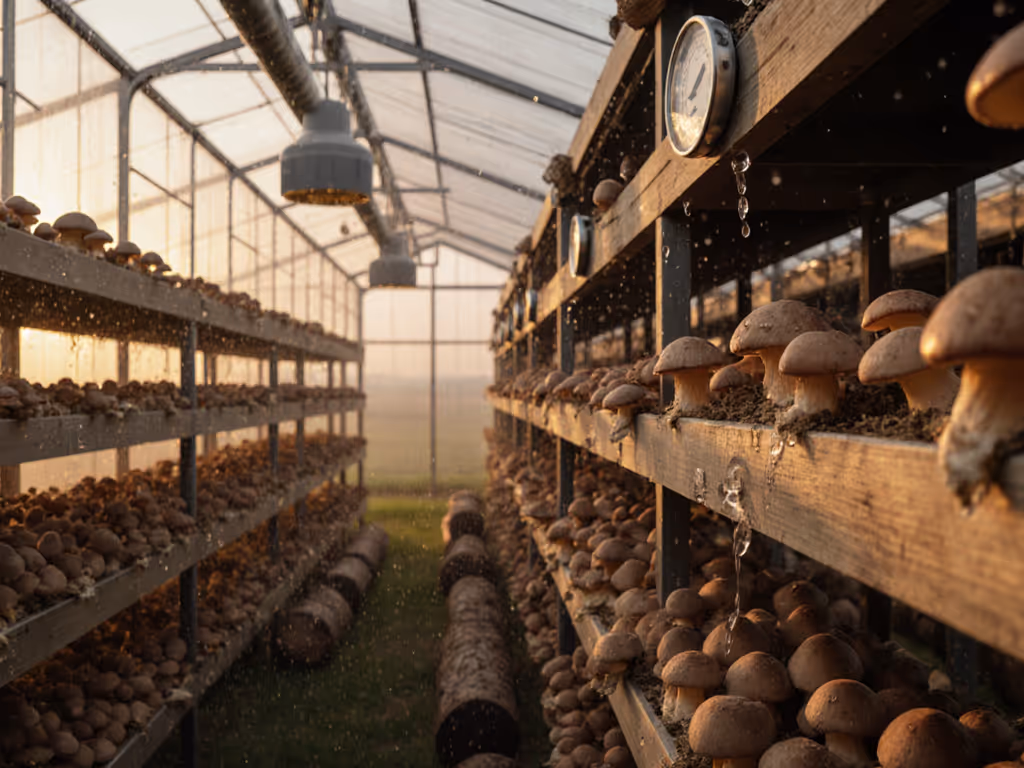
This is where mushroom growers reclaim efficiency. Vegetables sprawl horizontally; mushroom logs and blocks stack vertically. A 10-by-12-foot greenhouse can hold 60-80 fruiting logs on tiered shelving versus maybe 15-20 tomato plants. The ROI per square foot jumps dramatically.
You'll need heavy-duty metal shelving (2,000+ lb capacity per shelf to handle wet logs and substrate). Adjustable heights between shelves are critical, aim for 18-24 inches to allow pin formation and hand harvest. Avoid wood shelving; it rots under constant humidity and becomes a pest refuge. I installed industrial steel racks (about $400 for a three-tier unit that covers 80 square feet of floor space). Built sturdy. Already regretting I didn't go bigger.
Ventilation: The Non-Negotiable
Here's the honest part: passive vents alone won't cut it for mushroom fruiting chambers. You need active air exchange, but designed carefully. If you're choosing fans and airflow systems, compare options in our ventilation performance guide.
In a typical vegetable greenhouse, you run an exhaust fan constantly during the day and vent sides or roof with louvers. For mushrooms, you want quieter, more controlled exchange. I installed a small 6-inch inline duct fan ($80) with a humidity sensor and thermostat controller ($120). It cycles on when humidity exceeds 95% (preventing mold) or temps exceed 68°F. During fruiting, it runs 10-15 minutes per hour in short pulses, enough to swap stale air without drying pins.
Alternatively, passive through-vents at floor level and a ridge vent at the roof (baffled to prevent rain entry) can work if you accept slower air changes. But passive setups require obsessive monitoring, especially in shoulder seasons when external conditions fluctuate daily.
Humidity Control: Active vs. Passive
A vegetable greenhouse dries out; a mushroom space fights wetness. The easiest lever is a humidifier, either a plug-in ultrasonic unit ($100-300) or a gravity-fed misting system that ties to your drip line ($50-200). I use two ultrasonic humidifiers set to 85% and triggered by a wireless sensor. They're not scientific, but they stabilize the environment enough that I'm not hand-misting three times daily.
More robust setups use evaporative cooling (a swamp cooler effect) or capillary matting that wicks water constantly. If you're in a dry climate (Southwest, high plains), evaporative cooling plus misting nets the best bang. If you're in a humid region (Northeast, Pacific Northwest, Southeast), your battle is controlling excess humidity without creating mold. In consistently muggy climates, an active system can help—see our dehumidifier comparison. Here, the focus shifts to airflow over adding moisture.
Substrate Management Infrastructure
Mushroom growing requires prep space separate from fruiting. You'll need a mushroom substrate management zone with bins, pasteurization or pressure-cooking equipment, inoculation surfaces, and quarantine shelves. Many growers dedicate one corner or an adjacent outbuilding for this. I started trying to do it all in one greenhouse, a mistake. Cross-contamination risk shot up, and I had no clean space to work.
A minimal setup: a small prep bench, a pressure cooker or 55-gallon drum for pasteurization, sealed storage bins for bulk substrate, and a designated inoculation corner with a small HEPA filter or still-air box. This takes another $300-600 in equipment and doesn't have to live in the greenhouse proper. A garage corner or shed works fine. For a dedicated clean workspace, consider our shed-to-greenhouse conversion guide.
Climate Data: What the Numbers Tell Us
| Parameter | Vegetable Greenhouse | Mushroom Fruiting Chamber |
|---|---|---|
| Light | 12-14 hrs/day, 200+ μmol/m²/s | <200 lux, often 0 hrs/day |
| Temperature | 65-75°F (day), 50-55°F (night) | 50-68°F, ±2°F variance ideal |
| Humidity | 50-70% | 80-95% |
| CO₂ | Ambient ~400 ppm | 600-1,200 ppm tolerated |
| Air Changes/Hour | 4-6 ACH (continuous) | 2-4 ACH (pulsed or periodic) |
These differences drive everything: glazing choice, heating/cooling strategy, ventilation type, and seasonal operation timeline.
Real Build: What I Did, What I'd Do Differently
I partitioned my 10-by-12 greenhouse with heavy black plastic curtains (draped over PVC hoops bolted to the frame, about $80 total). The eastern half became the fruiting chamber; the western half kept its glass clear for seedling starts. This dual-use approach maximizes a single structure but requires careful humidity sealing. Air leakage between zones was my biggest snag. I added magnetic weatherstripping and a zip door ($40). Still not perfect, but humidity now stays separate.
For heating, I added a small oil-filled radiant heater ($200) on a timer and thermostat. It runs 2-3 hours nightly in winter, maintaining 58°F baseline. Way cheaper than running a full-sized space heater and responsive enough for my mushroom temps.
What I'd do differently: invest upfront in proper automated humidity and temperature control ($300-400 total for sensors and controllers). I spent six weeks fiddling with manual adjustments before committing to hardware. Also, buy better shelving from day one. The first racks I used sagged under weight after two seasons. Steel shelving cost more initially but lasts.
Year-Round Reality Check
A year-round greenhouse for vegetables relies on passive solar, insulation, and season-appropriate crops. A year-round mushroom cultivation greenhouse runs more consistently (flushes don't care about external daylight), but demands stable climate control. Your utility bills will be slightly higher than a passive vegetable setup, but lower than a heated-only growing space because you're not chasing extreme temperatures.
Winter is your stronghold. Cool, humid outdoor air is an ally. Summer is your enemy; you'll run the humidifier and fan more aggressively to offset heat. Spring and fall are your goldilocks months: minimal heating, natural humidity, stable temps.
Final Verdict
Transforming a standard greenhouse for mushroom cultivation is doable and worthwhile if you're ready to think differently. You're swapping light optimization for darkness, fighting wetness instead of drought, and stacking vertically instead of sprawling. The upfront retrofit costs $400-800 beyond a basic greenhouse shell (shade cloth, shelving, humidity control, ventilation upgrades). Labor is 1-2 weekends if you're handy; day rates for a pro installer run $500-1,200.
The win: fresh oysters and shiitake year-round, ROI per square foot that beats vegetables, and a fascination with fungi that turns a structure into a science project. The catch: it demands more precise climate tuning than casual growers expect. Start with oysters. They're forgiving. Document every adjustment. And when something doesn't fit the manual, reach out to your vendor. Responsiveness is part of the package.
If you value transparency, resilience, and growing something truly hard-to-find locally, a mushroom greenhouse earns its space. Real mushrooms, real timeline, real harvest.
Related Articles