Fruit Set Greenhouse Kits: Integrated Pollination
By Takumi Sato • 27th Feb
Covering greenhouse production without a robust pollination strategy is like building a ship with no rudder, you've framed the walls, sealed the climate, and optimized every other variable, only to watch flowers drop and fruit never materialize. A fruit set greenhouse depends entirely on one critical factor: consistent, reliable pollination. Yet most commercial and serious hobbyist growers treat pollination as an afterthought, scrambling between manual hand-pollination labor, hoping a few bees wander in, or crossing their fingers with wind alone. The result is predictable: soft-set crops, odd-shaped fruit, yield gaps of 20-40%, and climbing labor costs that erode ROI. An integrated pollination system eliminates guesswork by combining proven methods (managed bumblebees, robotic precision, strategic habitat design, and redundant fallback options) into a single, documented protocol. This is not complexity for its own sake; it is deliberate over-specification to ensure one harvest never fails due to a pollination gap.
The Problem: Fruit Set Failures in Controlled Environments
In outdoor orchards, pollination happens by default. A mixed landscape, wild insects, and wind provide loose but usually adequate service. Inside a greenhouse, that ambient support vanishes. Sealed walls block wind. Pest barriers exclude wild pollinators. Temperature and humidity are optimized for crop growth, not insect activity. The result is a biological void: flowers bloom in abundance, but nothing reliably transfers pollen from anther to stigma.
When fruit set fails, the damage ripples:
- Yield collapse: A tomato greenhouse averaging 45 kg/m² per year can drop to 30 kg/m² if pollination is sporadic, a 33% loss.[3]
- Fruit deformation: Peppers, strawberries, cucumbers, and melons set misshapen or aborted fruit when pollen delivery is incomplete, making them unmarketable.[3]
- Labor explosion: Hand-pollination requires 10× the human effort compared to insect pollination for equivalent coverage.[3]
- Crop loss windows: A single week of poor pollination (caused by hive collapse, disease, or transient bee inactivity) can erase an entire flush of flowers.
- Hidden costs: Renting replacement bee hives, emergency hand-labor, chemical thinner applications, or crop insurance claims add up fast.
For small-scale and mid-size growers, this gap between potential and reality is where the margin vanishes.
The Agitation: Why Simple Approaches Fail
Single-Method Dependency Creates Fragility
Many growers anchor their pollination plan to one lever: "We'll bring in bumblebee hives quarterly." Bumblebees are excellent, far superior to honeybees for greenhouse use due to their foraging behavior in low light and cooler temps.[3] A commercial bumblebee hive from producers like Biobest or Koppert has an active lifespan of 8-12 weeks, after which the colony collapses and must be replaced.[3] That built-in cycle is manageable with planning, but it is not redundant.
If a hive arrives sick, if a supplier shipment is delayed, if interior humidity spikes and disrupts bee activity, the entire season's timing is jeopardized. Overbuild once; sleep through the pollination window, because a second, independent method stands ready.
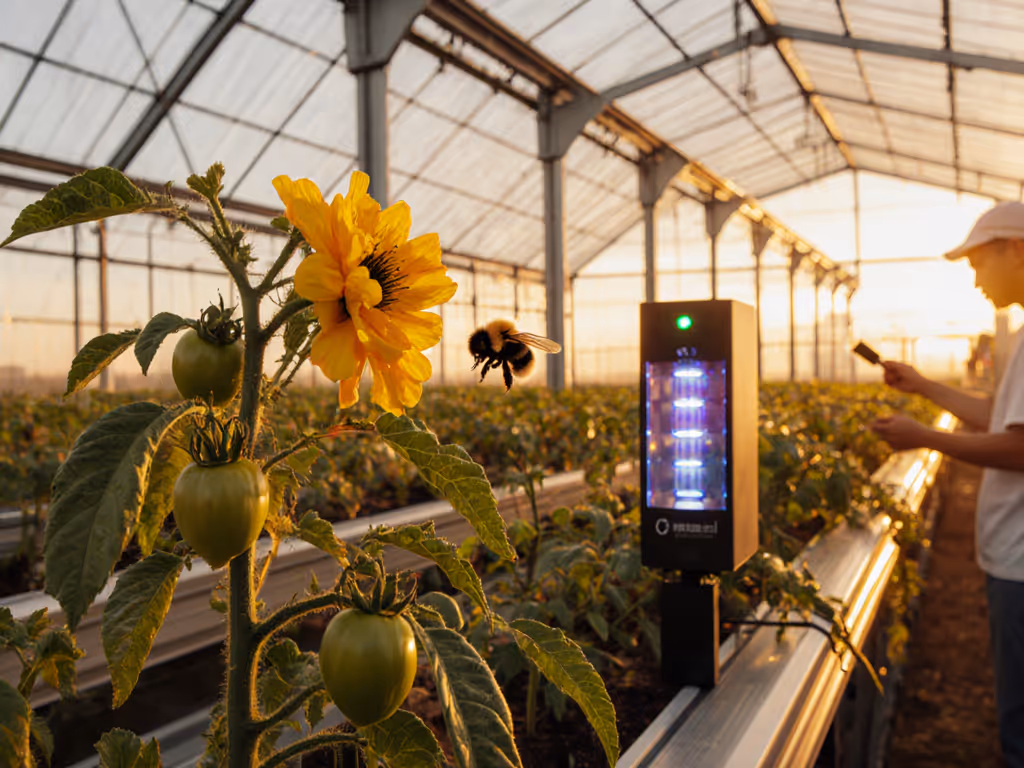
Robotic Precision Still Lacks Scale
In 2023, researchers at Washington State University's Center for Precision and Automated Agricultural Systems (CPAAS) demonstrated a robotic pollination system that achieved 84% successful flower pollination using an AI-guided manipulator arm and electrostatic spray of liquid pollen suspension.[1] That is a dramatic leap from the 56% success rate in 2022.[1] The system uses computer vision (YOLOv8 image analysis) to detect king flowers at a 91% accuracy rate and delivers pollen to individual flowers in 4.8 seconds per flower cluster.[1]
However, robotic pollination at scale remains a research-into-practice transition. Capital cost is high. Integration requires robust IT infrastructure and trained operators. Deployment is fastest in high-value, perennial crops (apples, almonds, blueberries in larger orchards). For a 2,000 m² strawberry or pepper greenhouse, robotic pollination is not yet a plug-and-play option, but in 5-10 years, hybrid systems (robot + bees + manual backup) will be standard in premium operations. To prepare for that future and improve reliability now, consider our smart climate control integration guide.
Hand-Pollination Does Not Scale Beyond Micro-Operations
Manual pollination using vibration wands or paint brushes works in tiny hobby greenhouses. But the labor math is brutal. A 1,000 m² greenhouse in full pepper bloom requires perhaps 150-200 labor-hours across a 2-week bloom window. At $20/hour fully-loaded, that is $3,000-$4,000 per week just for pollination, likely exceeding the crop's value on a per-unit basis.[3] Hand-pollination is a backstop, not a primary strategy.
System Failure is Predictable; Preparation is Cheap
Risk-first thinking means accepting this: any single pollination method will encounter a failure mode. A hive weakens. A robot needs maintenance. Weather delays delivery. Labor calls in sick. Rather than gambling on one survivor, engineer the system with at least two independent methods operating in parallel, so that crop loss is impossible during a supplier hiccup or maintenance window.
The Solution: Integrated Pollination System Architecture
An integrated pollination system combines mechanical, biological, and chemical methods into a tiered, documented protocol. Each tier adds redundancy without redundant cost.
Tier 1: Managed Bumblebee Hives (Primary Method)
Bumblebees are the workhorse. They pollinate more actively than honeybees in cool, humid greenhouse conditions, and they do not require outdoor forage.[3] A typical deployment strategy:
- Initial hive count: Based on crop type and flowering window. Strawberries and cucumbers require denser bee populations than peppers. A 1,000 m² strawberry house typically starts with 2-4 hives; a 1,000 m² pepper house may need 1-2.[3]
- Replacement schedule: Introduce new hives weekly or bi-weekly once the first hive shows age (reduced foraging, visible decline).[3]
- Supplier relationship: Establish standing orders with Biobest, Koppert, or a regional distributor 4-6 weeks before your bloom cycle begins. Confirm delivery windows and backup options in writing.
- Hive placement: Position hives near high-value flower clusters. Shield them from direct fans and temperature swings. Provide a small landing board (entry ramp) at hive mouth.
- Interior conditions: Maintain 18-25 °C and 60-80% RH during active pollination. Below 15 °C or above 30 °C, bee activity drops sharply.[3] Avoid insecticide or fungicide sprays 48 hours before and 72 hours after hive introduction; these kill bees.[3]
Data point: According to Biobest technical guidance, properly supported bumblebee hives increase fruit set by 30-50% compared to unpollinized controls and improve fruit quality metrics (shape, size, sugar content) measurably.[3]
Tier 2: Robotic or Electrostatic Backup (Secondary Method)
As robotic pollination matures, hybrid greenhouses will deploy a mobile robotic arm that patrols flower clusters during windows when bee activity is low (early morning, overcast days, or during hive transitions). For now, this tier is most practical in high-value perennial crops or large commercial operations.
For smaller operations, Tier 2 can be an electrostatic spray applicator (a handheld or cart-mounted device that mists a pollen suspension across canopy at low cost). Used once or twice during the critical 7-10 day post-hive-introduction window, it provides insurance against uneven bee coverage.
Tier 3: Manual Vibration Backup (Tertiary, Last-Resort Method)
Keep two cordless vibration wands on-site, plus a small quantity of dry pollen (stored cool, dry) or pollen-collection equipment. If a hive fails mid-bloom and no replacement arrives on time, a grower can spend 2-3 focused hours vibrating high-value clusters to set a meaningful fraction of fruit. It is not full coverage, but it salvages the crop.
System Integration Checklist
Risk-first design means explicit, testable protocols. Use this checklist to harden your pollination plan against failure:
- Documentation: Write a one-page pollination calendar specific to your crop, hive supplier, and target fruit set. Include hive arrival dates, expected bloom windows, bee-care tasks, and backup contacts.
- Supplier redundancy: Have a secondary bumblebee supplier identified and vetted, even if you never use them. Know their lead times.
- Equipment readiness: Store vibration wands (charged, oiled), dry pollen (vacuum-sealed, dated), and a small digital thermometer/hygrometer in an accessible, labeled kit.
- Temperature/humidity logging: Use a simple data logger to record interior conditions continuously. Review logs weekly during bloom. If RH falls below 50% or temps exceed 28 °C for more than 4 hours, respond immediately (add humidity, shade, ventilation).
- Hive health checks: Inspect each hive weekly for bee activity, visible cleanliness, and food consumption. Record observations. If a hive shows decline, order a replacement hive 2-3 days before you expect total collapse.
- Crop monitoring: Scout flowers daily during peak bloom. Count set-fruit vs. dropped-flower percentages. If set drops below 70%, escalate to Tier 2 or Tier 3 within 24 hours.
Covering Greenhouse Design to Support Pollination
A covering greenhouse (film, polycarbonate, or glass structure) must be designed to support pollinator activity, not just contain it. Design for:
- Thermal stability: Bees forage most actively at 20-25 °C. Install adequate ventilation (roof vents, side louvers, fans) so that on a sunny day, interior temps do not spike above 28 °C. A 20% undersizing of vents is the most common design failure; over-specify shading and ventilation if bees are in the house.
- Humidity buffering: Maintain 65-75% RH during bloom. Use wet-wall pads, misting, or dehumidifiers to manage swings. Condensation on bee wings impairs flight; excessively dry air (below 50% RH) stresses bees and reduces pollen viability.
- Light penetration: Bees see ultraviolet light and use it to navigate flowers. Glazing choice matters: polycarbonate (twin-wall or multi-wall) transmits more UV than single-pane acrylic or film. For material trade-offs in different climates, see our polycarbonate vs glass vs film glazing tests. If you are investing in bees, choose glazing that supports their sensory range.
- Insect entry/exit: If your design includes high-volume exhaust fans for summer cooling, ensure that intake air passes through bee-safe screening (mesh size ~2 mm) so bees cannot be sucked into the fan. Install a hinged or removable screen so that in winter (no bees) you can remove it and maximize airflow.
- Wind and structural margin: A covering greenhouse with live bee colonies must never fail structurally, because a collapse kills the hive and the crop. Use the same risk-first, over-specification principle: if your local wind speed is 60 km/h, design for 80 km/h. If snow load is 40 kg/m², design for 60 kg/m². For verified models and ratings, compare our cold climate greenhouse kits. Overbuild the frame, anchor points, and fasteners. Inspect annually and replace any corroded hardware. Wind is a test you schedule for; do not let poor design be the failure mode.
Actionable Next Steps
Step 1: Define Your Crop and Bloom Window
Download a crop-specific pollination guide from your bumblebee supplier (Biobest, Koppert, or local equivalent). Identify your target fruit-set percentage (typically 85-95% for commercial crops), your peak bloom window (usually 2-3 weeks compressed), and your hive requirement (usually 1 hive per 500-1,000 m², depending on crop).
Step 2: Audit Your Covering Greenhouse Structure
- Measure and log your ventilation capacity: total venting area (roof + side) as a percentage of floor area. Target: ≥15% for bee-supporting climate control.
- Inspect your glazing for UV transmission (acrylic and polycarbonate data sheets list this; aim for ≥40% transmission in the 300-400 nm range).
- Check all anchor bolts, corner bracing, and fasteners for corrosion. Tighten or replace as needed.
- Confirm wind-load design specs in your structure's documentation. If unclear, consult the manufacturer or a structural engineer.
Step 3: Establish Your Hive Supply Chain
- Contact your primary bumblebee supplier 6-8 weeks before your bloom window opens. Provide your greenhouse dimensions, crop type, and desired hive count. Confirm delivery schedule in writing (e.g., "First hive arrives March 15; second hive on March 22; weekly replacements continue until May 10").
- Identify a secondary supplier as backup. Write their contact details in your pollination calendar.
- Request technical support: many suppliers (e.g., Biobest) provide free on-site visits, hive placement advice, and troubleshooting hotlines.
Step 4: Create Your Pollination Protocol Document
Write a one-page reference sheet that you post inside the greenhouse. Include:
- Bloom window dates and expected hive arrival schedule.
- Daily hive health checks: what to look for (bee activity, cleanliness, entrance congestion).
- Interior climate targets: temperature, humidity, light during pollination hours.
- Response ladder: if hive activity drops, escalate from Tier 1 -> Tier 2 -> Tier 3 within specific timeframes.
- Contact list: primary hive supplier, backup supplier, local extension agent, integrated pest manager, experienced grower mentor.
- Equipment inventory: location and status of vibration wands, pollen supply, thermometer, data logger.
Step 5: Invest in Monitoring and Tiered Backup
Budget for:
- A wireless temperature/humidity data logger (~$50-150) for continuous interior monitoring.
- Two cordless vibration wands (~$200-400 total) for emergency manual pollination.
- A small stock of dry pollen or pollen-suspension premix (~$100-200), stored properly in a cool location.
- One unplanned extra hive cost (~$80-150) as a contingency in your annual budget.
Total: ~$500-1,000 one-time; then hive subscriptions and monitoring are ongoing. Compared to a 30-40% crop loss event (several thousand dollars), the insurance is cheap.
Step 6: Pilot and Document
Deploy your integrated system in your first season with close observation:
- Log daily hive activity, interior climate, and flower-to-fruit set daily.
- Photograph hives and flowering canopy every few days.
- If any tier activates (e.g., you manually pollinate because a hive declines), document exactly what triggered it and how long the backup took.
- At season-end, review your logs and refine the protocol for next year.
After two seasons of data, you will own a climate- and crop-specific playbook that is far more valuable than any generic manual.
The Confidence Gain
An integrated pollination system is an investment in certainty. You will not lose fruit to pollination failure. Your yields will be predictable. Your labor will be devoted to plant care, pest management, and harvesting, not emergency hand-pollination. Bees will work while you sleep. When a hive ages out, a replacement is already scheduled. When equipment needs maintenance, a backup method is ready.
This is not overkill. Overbuild once; sleep well when the bloom comes. Your covering greenhouse is a controlled environment; it deserves a controlled, redundant, documented pollination strategy. Design it now, deploy it methodically, and your harvests will be as reliable as the structure that shelters them. Wind is a test you schedule for; fruit set is a promise you can keep.
Related Articles